How To Localize an iOS(iPhone) App
Introduction
 To internationalize an iOS application (iPhone, iPad, iPod), a special localization file type known as Apple’s strings (.strings) is required. This file follows a key/value pair schema where the first entry is the lookup key, and the next entry is the associated value for that key.
Take a look at this example: English localization strings file:
“Father” = “Dad”;
“Mother” = “Mom”;
Japanese localization strings file:
“Father” = “お父さん”;
“Mother” = “お母さん”;
As you can see, the key, “Father”, will return the value “Dad” for English, and “お父さん” for Japanese. Likewise, the key, “Mother”, will return the value “Mom” for English, and “お母さん” for Japanese.
This article will walk you through how to extract and create localization strings files for your storyboards and user-defined strings.
Localizing your storyboard
Xcode 4.2 introduced ‘storyboard’, a visual representation of the user interface of an iOS application. In previous versions of Xcode, developers were limited to only editing one single view at a time, but storyboard now allows developers to see the entire scope of the application’s view.
Use Base Internationalization for your storyboard (available from Xcode 4.5)
- Select your project from Project Navigator
- Click the checkbox for “Use Base Internationalization”
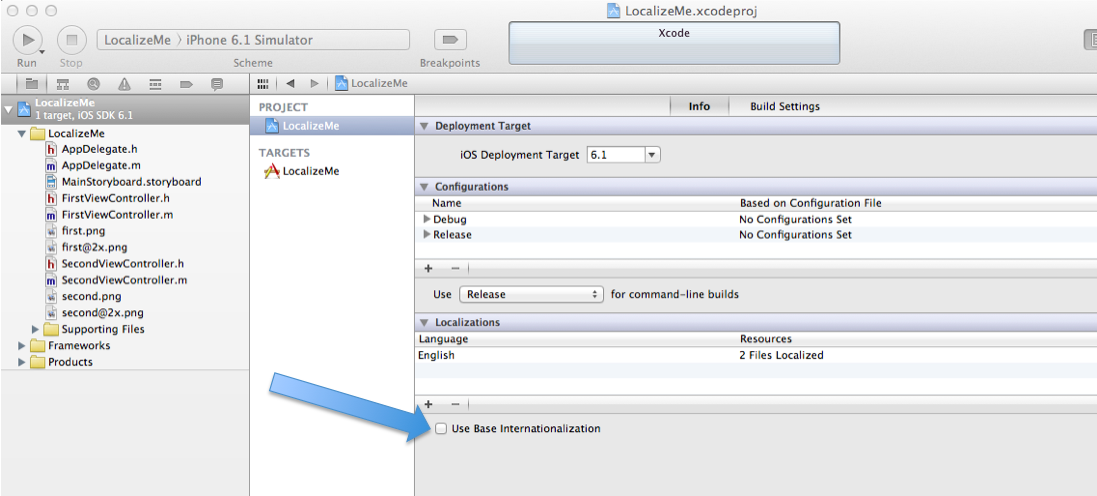
Add the language(s)
- Click the ‘+’ button to add languages
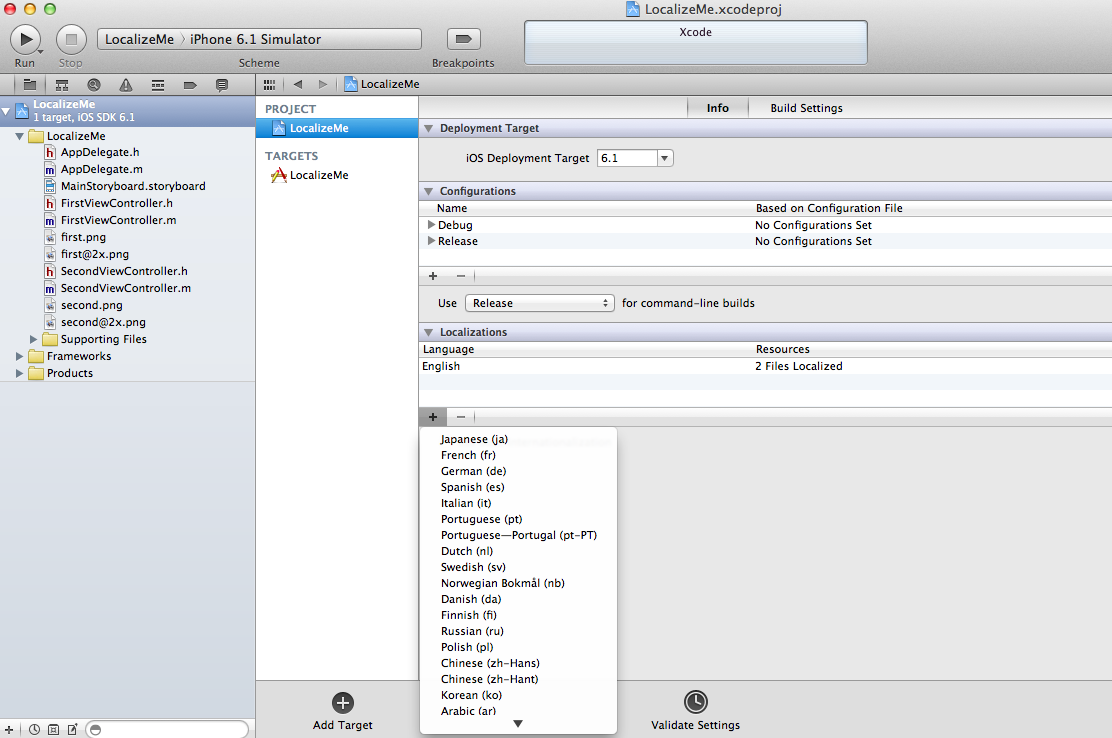
Your storyboard now has a drop down menu to select between the various storyboards
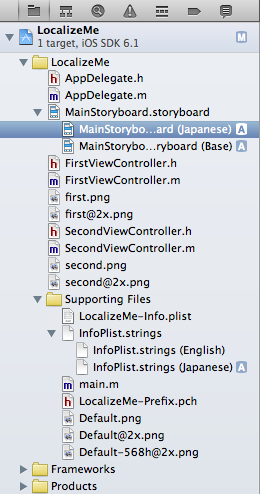
Covert storyboard to Localizable Strings
- Select the new language storyboard that you created
- Find the Localization section from the File Inspector
- Set the view type to “Localizable Strings” if it is not already selected
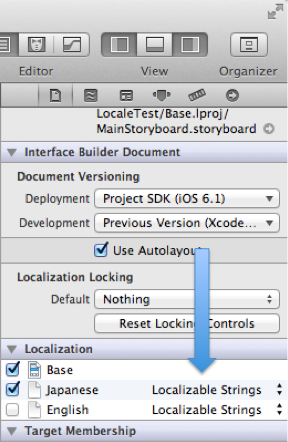
You know are now viewing the strings version of your storyboard
Add your translations
For speedy and accurate translations, you can send your strings file to Conyac to be translated into any language of your choosing.
Localizing your user-defined strings
The text in your apps is not only limited to the ones found in the storyboard, but also from user-defined strings as well. To be able to localize user-defined strings, a new strings locale file and the helper macro, NSLocalizedString is required.
Create the locale files
- Create a new strings locale file from the main menu: File -> New -> File…
- Select iOS -> Resource -> Strings File
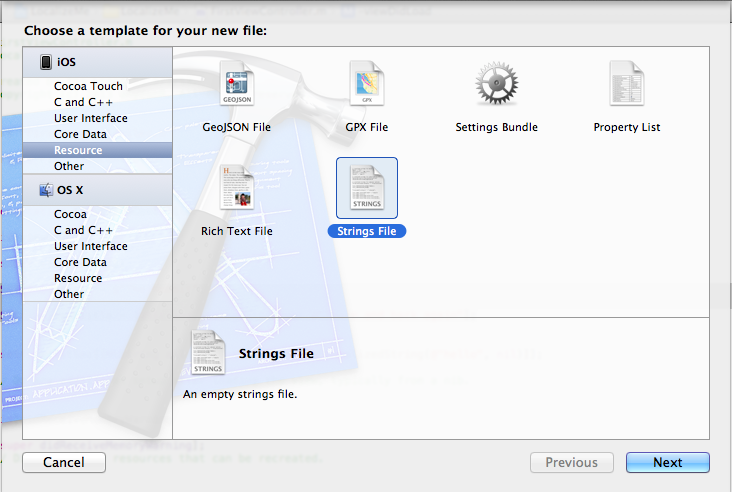
- Name your file: Localizable.strings (default name)
- Select Localizable.strings from the Project Navigator
Click on the “Localize…” button from the File Inspector
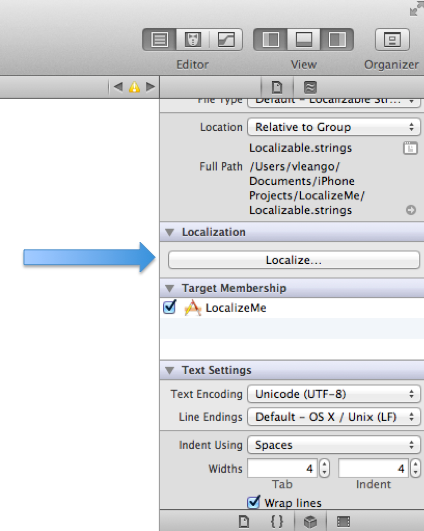
Select a default-localized language
Select Localizable.strings from the Project Navigator once again
Click the checkbox of the additional language that your app supports in the Localization section of the File Inspector
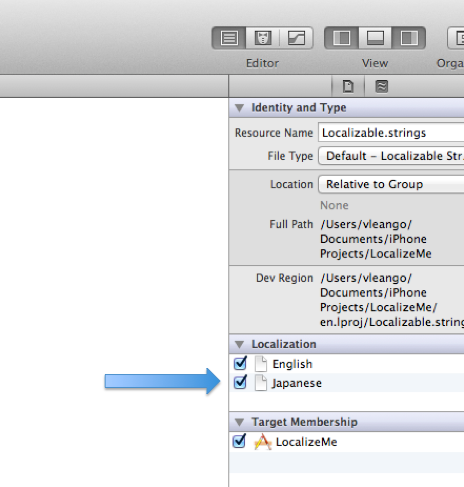
Your Localizable.strings file now contains multiple languages. Before adding locale entries, we need to know how to use the localization macro, which is explained next.
Use the helper macro NSLocalizedString
A reminder, strings are usually created like this:
NSString *title = @"Harry Potter";
NSString *desc = [NSString stringWithFormat:@" uses magic"];
To be able to localize these strings, the NSLocalizedString macro is needed.
NSString * title = [[NSString alloc] initWithFormat:NSLocalizedString(@"Harry Potter", nil)];
NSString * desc = [[NSString alloc] initWithFormat:NSLocalizedString(@"magic", nil)];
NSLocalizedString(@"Harry Potter", nil) looks in our Localizable.strings file for the "Harry Potter" key, and inserts the value in its place.
For example, if our Localizable.strings file looks like this:
Localizable.strings (English):
“Harry Potter” = “Harry Potter”;
“magic” = “ uses magic”;
Localizable.strings (Japanese):
“Harry Potter” = “ハリーポッター”;
“magic” = “は魔法使い”;
when NSLocalizedString(@"Harry Potter", nil) is used: * "Harry Potter" will be displayed if the device is set to English * “ハリーポッター” will be displayed if the device is set to Japanese
Add your translations
For speedy and accurate translations, you can send your Localizable.strings file to Conyac to be translated into any language of your choosing.
Conclusion
With the completion of this guide, you are now able to add localization to your iOS applications. I hope this guide was useful to you. If you have any questions or feedback, please send them to support@conyac.cc
Need experienced translators to translate your localization files? Conyac is the perfect solution!
Reliable, Fast, and Affordable.